Showing posts with label django Project-1 (BTMS). Show all posts

18.Form rendering options in edit.html page for django project


  • {{ form.as_table }} will render them as table cells wrapped in <tr> tags

<h1>add contact</h1>
<form action="{% url 'contacts-new' %}" method="post">
  {% csrf_token %}

  <ul>
  {{ form.as_table }}

  </ul>
<input id='save_contact' type="submit" value="save"/>

   
</form>
<a href="{% url 'contacts-list' %}">back to list</a>
 

Output
==========================================

add contact

back to list
=============================================


  • {{ form.as_p }} will render them wrapped in <p> tags
<h1>add contact</h1>
<form action="{% url 'contacts-new' %}" method="post">
  {% csrf_token %}

  <ul>
  {{ form.as_p }}

  </ul>
<input id='save_contact' type="submit" value="save"/>

   
</form>
<a href="{% url 'contacts-list' %}">back to list</a>
 
================================
Output

add contact


back to list

 =====================================

  • {{ form.as_ul }} will render them wrapped in <li> tags 

<h1>add contact</h1>
<form action="{% url 'contacts-new' %}" method="post">
  {% csrf_token %}

  <ul>
  {{ form.as_ul }}

  </ul>
<input id='save_contact' type="submit" value="save"/>

   
</form>
<a href="{% url 'contacts-list' %}">back to list</a>


Output

 =================

add contact

back to list
 ============================

17. How to work with file upload in django in the current project


hai guy let us see the file/image upload in the BTMS project...


first let us create a app ie., uploader using terminal in the project folder


$python manage.py startapp uploader


setting .py

INSTALLED_APPS = (
    'django.contrib.admin',
    'django.contrib.auth',
    'django.contrib.contenttypes',
    'django.contrib.sessions',
    'django.contrib.messages',
    'django.contrib.staticfiles',
    'login',
    'contacts',
    'uploader',
)


MEDIA_ROOT = os.path.join(BASE_DIR, 'media')
MEDIA_URL = '/media/'


----------------------


in the app ie., uploader

model.py

from django.db import models
from django.forms import ModelForm

class Upload(models.Model):
    pic = models.ImageField("Image", upload_to="images/")    
    upload_date=models.DateTimeField(auto_now_add =True)

# FileUpload form class.
class UploadForm(ModelForm):
    class Meta:
        model = Upload

View.py

from django.shortcuts import render
from uploader.models import UploadForm,Upload
from django.http import HttpResponseRedirect
from django.core.urlresolvers import reverse
# Create your views here.
def upload(request):
    if request.method=="POST":
        img = UploadForm(request.POST, request.FILES)     
        if img.is_valid():
            img.save()
            return HttpResponseRedirect(reverse('imageupload'))
    else:
        img=UploadForm()
    images=Upload.objects.all()
    return render(request,'upload.html',{'form':img,'images':images})


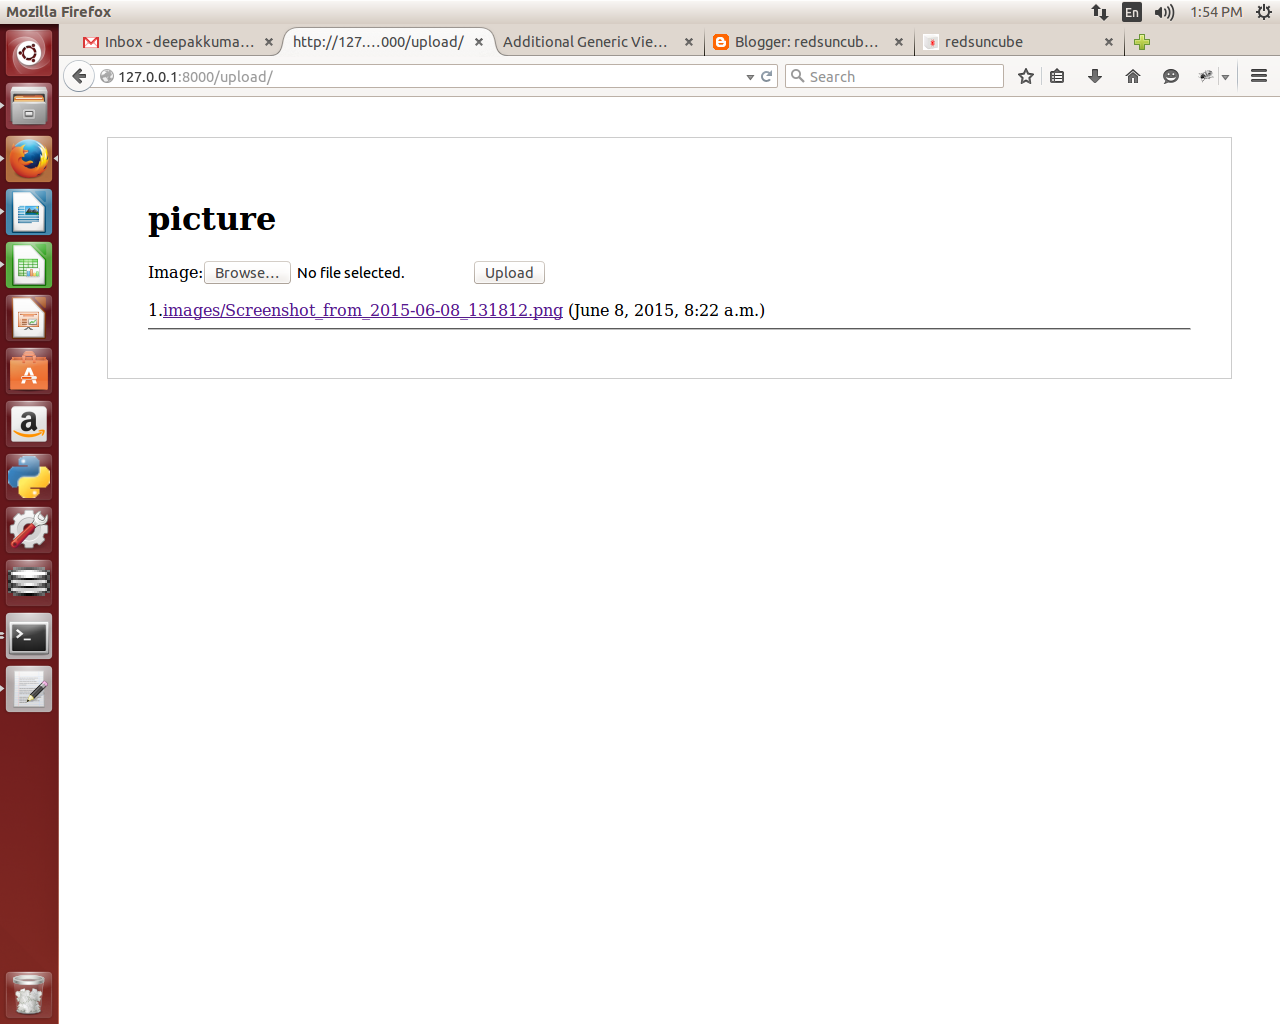
Create a folder templates and create a file upload.html:


<div style="padding:40px;margin:40px;border:1px solid #ccc">
    <h1>picture</h1>
    <form action="#" method="post" enctype="multipart/form-data">
        {% csrf_token %} {{form}}
        <input type="submit" value="Upload" />
    </form>
    {% for img in images %}
        {{forloop.counter}}.<a href="{{ img.pic.url }}">{{ img.pic.name }}</a>
        ({{img.upload_date}})<hr />
    {% endfor %}
</div>


url.py
from django.conf.urls import patterns, include, url
from login.views import hello_page, home
from django.contrib import admin
from uploader.views import upload
admin.autodiscover()
import uploader.views
import contacts.views
from django.conf import settings
from django.conf.urls.static import static

urlpatterns = patterns('',
    # Examples:
    # url(r'^$', 'btms.views.home', name='home'),
    # url(r'^blog/', include('blog.urls')),

   # url(r'^admin/', include(admin.site.urls)),
    url(r'^upload/', 'uploader.views.upload', name='imageupload'),
    url(r'^$', hello_page, name='home'),
    url(r'^home/', home),
    url(r'^view/',contacts.views.ListContactView.as_view(),name='contacts-list',),
    url(r'^new$', contacts.views.CreateContactView.as_view(), name='contacts-new',),


)+ static(settings.MEDIA_URL, document_root=settings.MEDIA_ROOT)


=======


now the output is .....


it is fine ......


16. Let us understand how the view is working in django


so here how the this list is coming ...... let us check what is going inside ....


so for this we need to see the pages ie.,

1. contact_list.html
2. model.py

ie., check down


contact_list.html

<h1>Contacts</h1>

<ul>
{% for contact in object_list %}
<li>{{contact}}</li>
{% endfor %}
</ul>


model.py


from django.db import models

class Contact(models.Model):
    first_name = models.CharField(
        max_length=255,
    )
    last_name = models.CharField(
        max_length=255,

    )

    father_name = models.CharField(
        max_length=255,

    )

    email = models.EmailField()
  

    def __str__(self):

        return ' '.join([
            self.first_name,
            self.last_name,
            self.father_name,
        ])


so here check the red color highligted one


in the html page if we write contact in the filter that is which the list is coming

and in the model.py we wrote def __str__(self) means it is contact class only it will return and it is return with join for first name,last name and father name.

that is why it is coming......


so it means there u r getting first_name,last_name and father name write


now i want to make it different in table order................ ok before that let us try for different list order


wirte for that u need to do like this in html file  ie.,


<ul>
{% for contact in object_list %}
<li>{{contact.father_name}}</li>
{% endfor %}
</ul>


so i got only father name


now i will make the table and check for that in html file.......... ok let do it


<h1>Contacts</h1>

<table border=1>
<tr><th>First Name</th><th>Last Name</th><th>Father Name</th></tr>

{% for contact in object_list %}
<tr>
<td>{{contact.first_name}}</td>
<td>{{contact.last_name}}</td>

<td>{{contact.father_name}}</td>
</tr>
{% endfor %}
</table>


now the output is


15(c). Let us understand what we wrote in edit_contact.html in django project(Very Important)

let us consider this..... ie., 
 
 
<form action="{% url 'contacts-new' %}"


so  here we are using tags in the action attribute.  that is ....


{% url 'contacts-new' %}


{%url%} is the template tags ok 
 
 
then what is this contacts-new means  where it is going......


let us see url.py........


url.py
=====

from django.conf.urls import patterns, include, url
from login.views import hello_page, home
from django.contrib import admin

admin.autodiscover()


import contacts.views


urlpatterns = patterns('',
    # Examples:
    # url(r'^$', 'btms.views.home', name='home'),
    # url(r'^blog/', include('blog.urls')),

   # url(r'^admin/', include(admin.site.urls)),
    url(r'^$', hello_page),
    url(r'^home/', home),
    url(r'^view/',contacts.views.ListContactView.as_view(),name='contacts-list',),
    url(r'^new$', contacts.views.CreateContactView.as_view(), name='contacts-new',),


)


so in the url.py we added the  
 url(r'^new$', contacts.views.CreateContactView.as_view(), name='contacts-new',),
 
 
pattern        : ^new$
include file   : contacts.views.CreateContactView.as_view()

name           : contacts-new


so in the include file let see what is happening ....... ie., 
 
 
contacts(app)   =>   view.py   =>  CreateContactView =>  as_view()(this is functionality to view)
 
 
View.py 
======== 
from django.views.generic import ListView
from contacts.models import Contact
from django.core.urlresolvers import reverse
from django.views.generic import CreateView


class ListContactView(ListView):
      model=Contact
      template_name = 'contact_list.html'

class CreateContactView(CreateView):
      model = Contact
      template_name = 'edit_contact.html'
      
      def get_success_url(self):
          return reverse('contacts-list')
 
 
 --------------------------- so that is fine


so let see more ie, 
 
 
{% csrf_token %}

  <ul>
  {{ form.as_ul }}

  </ul>
<input id='save_contact' type="submit" value="save"/>

    
</form> 


so in these what is 
 
 
 {% csrf_token %} ?????????????
 
csrf=

Cross Site Request Forgery protection


 After more investigation it appears the {% csrf_token %} is
 always inserted if the form has method post and not if it doesn't.
 Very clever auto protection from Django.


ie., 
 
<form action="{% url 'contacts-new' %}" method="post"> 


so better to use ....


------------------- next what we will see 


<ul>
  {{ form.as_ul }}

  </ul>


let us know what is these actually doing .... ie.,


  {{ form.as_ul }} ???????????


in the output....... 
 
ie., 


i did not wrote the input box for every column ie., first name,, last name,, father name and email...


so when i given that in {{ form.as_ul}} i am getting that in unordered list becuase it is there in 
between <ul> tag ....


so how it is happening.....
 
 
let us think what actually it is happens....
 
 
so .....  


 let us take  files ie., 
 
 
edit_contact.html ,model.py , url.py and view.py
 
 
edit_contact.html
=================
 
<h1>add contact</h1>
<form action="{% url 'contacts-new' %}" method="post">
  {% csrf_token %}

  <ul>
  {{ form.as_ul }}

  </ul>
<input id='save_contact' type="submit" value="save"/>

    
</form>
<a href="{% url 'contacts-list' %}">back to list</a>


 View.py ======== from django.views.generic import ListView
from contacts.models import Contact
from django.core.urlresolvers import reverse
from django.views.generic import CreateView


class ListContactView(ListView):
      model=Contact
      template_name = 'contact_list.html'

class CreateContactView(CreateView):
      model = Contact
      template_name = 'edit_contact.html'
      
      def get_success_url(self):
          return reverse('contacts-list')
 
in model file we have four column ie., 
 
 
 model.py
=========
 
 from django.db import models

class Contact(models.Model):
    first_name = models.CharField(
        max_length=255,
    )
    last_name = models.CharField(
        max_length=255,

    )

    father_name = models.CharField(
        max_length=255,

    )

    email = models.EmailField()
   

    def __str__(self):

        return ' '.join([
            self.first_name,
            self.last_name,
        ])
 
 url.py
=======
 
from django.conf.urls import patterns, include, url
from login.views import hello_page, home
from django.contrib import admin

admin.autodiscover()


import contacts.views


urlpatterns = patterns('',
    # Examples:
    # url(r'^$', 'btms.views.home', name='home'),
    # url(r'^blog/', include('blog.urls')),

   # url(r'^admin/', include(admin.site.urls)),
    url(r'^$', hello_page),
    url(r'^home/', home),
    url(r'^view/',contacts.views.ListContactView.as_view(),name='contacts-list',),
    url(r'^new$', contacts.views.CreateContactView.as_view(), name='contacts-new',),


) 
 

flow steps

===========
 
-> so when i write {{form.as_url }} 
-> it is searching from action url ie., contact-new
-> so it will check through url.py..for contact-new... ie., 
  url(r'^new$', contacts.views.CreateContactView.as_view(), name='contacts-new',),
 
-> so it will go to contact---->  view  --->  CreateContactView ---->
and search for model name....... ie., 
  model = Contact
 
->so in model.py ----> class Contact(models.Model): --> it will send the column name what ever it have...
 
 
-> so coming to this example it will have 4 column ie., first name,last name,father name and email...
 
 
-> that column are appear with respect data type for example .... i am writing .... email as something.... without proper pattern,,,,


so i am getting error becuase model is sending the datatype also..... so it will take default validation....... ....it is great na..


Advantage of {{form.as_ul}}

=================


it is avoiding the html work... and validation for basic that is the result ....all are saying it is easy to develop compare to other......


----------------------------------- next we will see


<a href="{% url 'contacts-list' %}">back to list</a>


this is anchor tag  but in href see once again we use template tags......


so with this no need to write the complete path like 
 
 
<a href="127.0.0.1:8080/view"> back to list</a>
 
if we change the ip address we need to change all......


so it will become more work.... to avoid these 
 
django is using template tags..... great .....


15(b). Let us understand what we wrote in edit_contact.html in django project-(Tags)

Template Tags

Fundamental template tags

using

The tag using allows you to avoid repeated references to a Python dictionary in a template or dashboard report. This is a block tag with syntax
{% using <dictionary> %} ... {% endusing %}
For example:
if the 'targets' variable holds a dictionary of Congressional information, write
{% using targets %}
    Call {{ title_last }} and tell {{ them }} that {{ they }} should
    vote no:

    {{ listing_html|safe }}
{% endusing %}
instead of:
Call {{ targets.title_last }} and tell {{ targets.them }} that
{{ targets.they }} should vote no:

{{ targets.listing_html|safe }}

Arithmetic template tags

divide

The tag divide performs floating point division, and takes three arguments: top, bottom, and precision.
For example:
{% divide 72 499 2 %}
returns "0.14"

save_sum

The tag save_sum takes the sum of an arbitrary number of template variables and saves it to a new variable that you specify. The syntax is:
{% save_sum this that as those %}
If only one variable is specified, then save_sum allows you to copy a variable.

sign_difference

The tag sign_difference compares its two numeric arguments and returns a "-" string if and only if the first argument is less than the second. Otherwise it returns an empty string.

Miscellaneous template tags

localtime

The tag localtime formats a particular datetime value, say an updated_at column or {{ now }} above, according to a particular format string or relative_time which smartly picks a format from 1:30 am, Jan 31, or Jan 31 2009. For example:
{% localtime object.updated_at "m/j/y, P" %}

record

The tag record is used take a specified value or variable and append it to a specified list. The list is created if necessary, and an optional argument reportresult will tell the template tag to extract an integer result from an HTML tag. This tag can be used within a for loop to build a series of report results at different points in time or for different pages.
For example:
{% record reportresult progress_users in series_users %}

appends the current value of ``{{ progress_users }}`` to the list ``{{ series_users }}``, creating it if necessary.

required_parameter

The tag required_parameter is a dummy tag used in Dashboard Reports to indicate to ActionKit that a parameter is required from the user. For example, our built-in dashboard event_report contains:
{% required_parameter "campaign_name" %}
ActionKit sees this and prompts the user to enter a value for campaign_name. After using the above tag, the variable {campaign_name} is available in the report (note the single braces).

requires_value

The tag requires_value takes one argument, and raises a Template Syntax Error if the value of the argument is not available or resolves to False. This is useful in mailing snippets.
For example,
{% requires_value targets.count %}
ensures that code involving targets will display in that email.

right_now

The tag right_now creates the variable {{ now }} that contains the Python datetime object datetime.now(). You would include this once in your template as
{% right_now %}
before using filters like now|months_until and now|months_past.
Right_now also adds to context a variable {{ months_for_chart }} that is necessary to create the x-axis for our month-by-month bar graph charts used in certain dashboards.

select_index

The tag select_index takes a list, an index, and a variable name to save list[index] to.
For example:
{% select_index dogs 3 as dog %}

15(a). Let us understand what we wrote in edit_contact.html in django project-(Filters)

Filters

Arithmetic filters

Many of the filters in this section were designed to act on Query Report results. Our report results that return a single value are wrapped in a <span> html tag. For example, a variable containing a report result would actually hold <span class="query-">555</span> not '555.' While the HTML will render invisibly, built-in filters like add and subtract cannot handle a such a string. Many of our filters will strip away the HTML tag to pull out the report value.
More precisely, the filters extract the first occurrence of an integer or real number.

add

The filter add returns the sum of the argument and the value. This overrides Django's built-in filter which works on integers only. This filter can extract a number from the value and argument and add both floats and integers, rounding results to two decimal places (for adding dollar amounts, for example).
For example:
if a is <span class="query-">25.50</span> and b is 30
a|add:b
returns 55.25

commify

The filter commify renders a numeric value with commas as the thousands separator. This filter currently only works on integers, but like arithmetic filters above it will extract an integer from a string containing non-numeric characters.

humanize_seconds

The filter humanize_seconds takes a numeric argument (as a string or an integer) of a number of seconds and converts it to a smart string of the form "X days, X hours, X minutes, X seconds" with an appropriate level of detail (no more than two units).
For example:
{{ 5982|humanize_seconds }} and {{ 200000|humanize_seconds }}
return '1 hour, 39 minutes' and '2 days, 7 hours', respectively

mod

The filter mod returns the integer remainder of the value divided by the argument. Value and argument are coerced to be integers and this essentially exposes Python's % operator to you.
For example:
'35'|mod:'4'
returns 3

multiply

The filter multiply returns the product of the value mutiplied by the argument.
For example:
{{ suggested_ask|multiply:"2" }}
returns the user's suggested ask as defined on your page times two.

percent_of

The filter percent_of returns the value divided by the argument, formatted as a percentage with one decimal place.
For example:
If value is 72 and argument is 499
{{ value|percent_of:argument }}
returns '14.4%'

percent_of2

The filter percent_of2 functions like percent_of but returns the percentage formatted to two decimal places.

subtract

The filter subtract returns the difference of the value and the argument. Like add, this overrides Django's filter.

Miscellaneous filters

chart_data

The filter chart_data takes a list of numeric values and returns a comma-separated string for use in the Google charts some of our built-in Dashboard Reports use. If value has more or fewer than 12 elements, items are truncated from the left or zeroes are padded onto the right.
chart_data_misc
The filter chart_data_misc takes a list of numeric values and returns a comma-separated string for use in the Google charts some of our built-in Dashboard Reports use.

chart_labels

The filter chart_labels takes a list of numeric values and returns a pipe ('|') separated string for use in the Google charts some of our built-in Dashboard Reports use.

chart_spacing and chart_scale

These filters are used in the Google charts in some of our built-in Dashboard Reports. They act on the chart data in order to determine an appropriate y-axis scale and y-axis spacing for the chart.

country_names

The filter country_names takes a string consisting of a two-letter ISO language code, for example 'en' or 'fr' or 'pl.' It returns a list of tuples, with tuples of the form (<english country name>, <country name in the given language>) for each country.
For example:
{{ 'fr'|country_names }}
returns a list with elements such as (u'Poland', u'Pologne').

days_past

The filter ``days_past` can be used in your dashboard reports to generate a list of timestamps for the last several days, the number of which is specified by the argument. The value supplied to the filter must be a Python datetime object. You can use this to build a table or Google chart of data by day.
For example:
if now holds datetime.now() and the present time is '2013-01-15 20:00:00',
{{ now|days_past:6 }}
returns ['2012-01-10 00:00:00', '2012-01-11 00:00:00', '2012-01-12 00:00:00', '2013-01-13 00:00:00', '2013-01-14 00:00:00', '2013-01-15 00:00:00']
make_urls_absolute
This filter takes an HTML string for its value and tries to convert relative URLs into absolute ones. Takes a True/False argument for whether to use SSL.

month_ago

The filter month_ago acts on a MySQL style datetime value and subtracts one month.
For example:
{{ '2012-06-01 15:15:30'|month_ago }}
returns '2012-05-01 15:15:30'

month_year

The filter month_year acts on a MySQL style datetime value to return a prettified Month Year string we can use in monthly reports.
For example,
{{ "2010-06-01 01:02:03"|month_year }}
returns "June 2012".

months_past

The filter ``months_past` is used in the built-in progress report dashboards to generate a list of the last several months, the number of which is specified by the argument. The value supplied to the filter must be a Python datetime object. This can be used to build a table with a row of data for each month or to build a table for a Google chart.
For example:
if now holds datetime.now() and the present time is '2012-06-01 19:00:00',
{{ now|months_past:12 }}
returns ['2011-07-01 00:00:00', '2011-08-01 00:00:00', '2011-09-01 00:00:00', '2011-10-01 00:00:00', '2011-11-01 00:00:00', '2011-12-01 00:00:00', '2012-01-01 00:00:00', '2012-02-01 00:00:00', '2012-03-01 00:00:00', '2012-04-01 00:00:00', '2012-05-01 00:00:00', '2012-06-01 00:00:00']

months_pastyr

The filter months_pastyr has been deprecated. Please see months_past.

months_until

The filter months_until has a specific use in the built-in progress report dashboards. It acts on a Python datetime object that holds the current time, and returns a list that can be iterated over with an entry for each month in the calendar year up to now.
For example:
if now holds datetime.now() and the present time is '2012-06-01 19:00:00',
{{ now|months_until }}
returns ['2012-01-01 00:00:00', '2012-02-01 00:00:00', '2012-03-01 00:00:00', '2012-04-01 00:00:00', '2012-05-01 00:00:00', '2012-06-01 00:00:00']

weeks_past

The filter weeks_past can be used in your dashboard reports to generate a list of timestamps for the last several weeks, the number of which is specified by the argument. The value supplied to the filter must be a Python datetime object. You can use this to build a table or Google chart of data by week.
For example:
if now holds datetime.now() and the present time is '2013-01-15 20:00:00',
{{ now|weeks_past:6 }}
returns ['2012-12-11 00:00:00', '2012-12-18 00:00:00', '2012-12-25 00:00:00', '2013-01-01 00:00:00', '2013-01-08 00:00:00', '2013-01-15 00:00:00']